Creating a teleporter in Roblox opens up endless possibilities for game design. This guide provides comprehensive instructions for both novice and experienced creators. You will learn fundamental scripting principles and advanced techniques for seamless player movement. Master how to implement reliable teleportation systems for enhancing gameplay and user experience. Discover efficient methods for linking locations, managing player states, and troubleshooting common issues. This resource ensures you build effective teleporters that enrich your Roblox worlds, making navigation intuitive and engaging for everyone. Explore new scripting features arriving in Roblox Studio for 2026. This is your ultimate resource for teleportation mastery.
)` to create dynamic visual flourishes like a swirling vortex, a bright flash of light, or even subtle shimmering particles. Similarly, playing sound instances (`Instance.new(Hey everyone, have you ever found yourself wondering, 'How do I actually make a teleporter in Roblox that works seamlessly for my players?' It’s a super common question, and honestly, it used to trip me up too when I first started building in Studio. But don't you worry, because today we're going to demystify the magic behind Roblox teleporters, making you feel like a scripting wizard in no time. Crafting effective teleporters is absolutely essential for creating engaging and expansive game worlds, guiding players effortlessly through your creations.
We will walk through the core concepts, practical applications, and even some advanced tricks that the pros use. By the time we are done, you will have a solid understanding of how these critical components function, enabling you to build confidently. Understanding the underlying logic of teleportation helps with more complex game mechanics and dynamic interactions. Plus, knowing how to debug potential issues will save you so much time and frustration during development.
Roblox Studio continues to evolve rapidly, and with new features anticipated for 2026, building robust systems is more important than ever. We'll cover everything from simple one-way jumps to intricate multi-destination networks with advanced logic. This guide ensures your players enjoy a smooth and immersive experience navigating your creations, making your games truly standout. You've got this, and I'm here to help you every step of the way on your journey to mastering teleportation.
Beginner / Core Concepts
1. Q: What is the simplest way to create a basic one-way teleporter in Roblox Studio?A: Creating your first teleporter is surprisingly straightforward, and it’s a foundational skill for any Roblox developer. You're essentially setting up two distinct parts: one acting as the origin point and another as the designated destination. The crucial step involves embedding a small script within your origin part. This script is programmed to detect when a player's character makes contact with the origin part. Upon detection, it instantly moves their character's `HumanoidRootPart` to the exact position of the destination part. Think of it as a magical hot plate; step on it, and *poof*, you’re somewhere new. This method is incredibly versatile and forms the core of even the most complex teleportation systems you'll eventually design. Remember, precise positioning for your destination part is incredibly important for player comfort, preventing annoying glitches like falling through the world. Always test it thoroughly from a player's perspective to ensure a smooth landing every time. You've got this, it's easier than it sounds!
2. Q: How does a basic Lua script make a teleporter function in Roblox?
A: At its heart, a basic Lua script for a teleporter operates by listening for a specific trigger event, most commonly a `Touched` event associated with a designated part in your game world. When a player's character steps onto this teleporter pad, the `Touched` event fires, signaling the script to initiate its action. The script then intelligently identifies the player's character model and, more specifically, its `HumanoidRootPart`. This `HumanoidRootPart` is the central component of a player's character, dictating its position and orientation. The script then precisely changes the `CFrame` (Coordinate Frame, encompassing position and rotation) of this `HumanoidRootPart` to match the `CFrame` of the pre-defined destination part. This instantaneous update of coordinates is what creates the seamless illusion of teleportation within the game. Understanding this event-driven nature of Roblox scripting is absolutely crucial here, as it dictates how your game dynamically reacts to player actions. Think of it as a sophisticated signal and response system, where a player's touch acts as the signal. This simple yet incredibly powerful mechanism allows for dynamic and interactive player movement throughout your Roblox experience. Try this tomorrow and let me know how it goes!
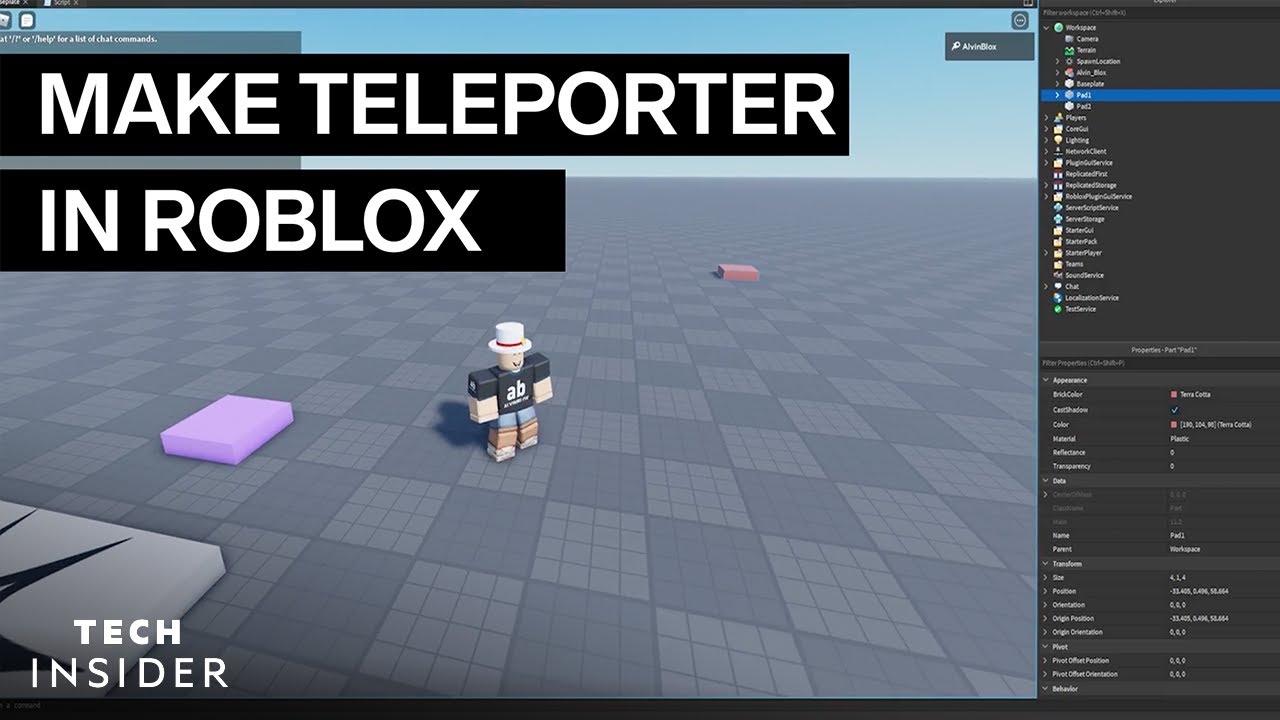
3. Q: What are the essential properties I need to configure for a teleporter part?
A: When you're setting up a teleporter part, configuring its properties correctly is vital for smooth operation and player experience. First and foremost, you'll need to ensure that the `CanCollide` property of your teleporter pad is set to `true`. This allows players to physically stand on the part, enabling the `Touched` event to fire reliably. Equally important is setting `Anchored` to `true`, which prevents the teleporter part from moving or falling due due to physics, keeping it firmly in its intended location. For visibility, its `Transparency` property should be `0` if you want players to clearly see the pad, or `1` if you prefer an invisible, hidden teleporter effect. Beyond these functional properties, remember that clear and consistent naming conventions are your best friends. Naming your parts descriptively, like 'TeleporterA_Start' and 'TeleporterA_Destination,' incredibly simplifies the scripting process and prevents frustrating debugging sessions later on. These small but crucial adjustments ensure your teleporter functions reliably and predictably every single time. You're on your way to becoming a Roblox pro by paying attention to these details!
4. Q: Can I make a teleporter that goes to another place (game) within Roblox?
A: Absolutely! Creating teleporters that send players to entirely different places, often referred to as 'games' or 'experiences,' within your larger Roblox project is not only possible but also a fantastic feature for creating expansive and interconnected worlds. This advanced form of teleportation utilizes Roblox's built-in `TeleportService`, a dedicated service specifically designed for handling cross-place travel. Instead of merely adjusting a part's `CFrame` within the same place, you'll employ a function like `TeleportService:Teleport(placeId, player)`. The critical piece of information you'll need here is the unique `PlaceId` of the target destination. You can find this ID in your Roblox Studio's Game Explorer or on the Roblox website when viewing your place. This feature is incredibly powerful for constructing multi-level games, creating expansive hub worlds that link to various mini-games, or separating different stages of your experience. I get why this confuses so many people, as it feels a bit more abstract than in-place teleportation, but mastering it unlocks incredible design possibilities. Just double-check that `PlaceId` carefully; one wrong digit can send players to the void! You've got this!
Intermediate / Practical & Production
5. Q: How do I create a two-way teleporter system efficiently in Roblox Studio?A: Designing an efficient two-way teleporter system in Roblox Studio involves a clever setup where two distinct teleporter pads can send players to each other. Essentially, each pad acts as both an origin point for teleporting away and a destination point for receiving players. You'll typically implement this using two separate scripts, one for each teleporter, though an advanced single script can also manage both. Each individual script will detect a player's touch on its respective pad and then, critically, teleport that player to the `CFrame` of the *other* pad's location. A common pitfall for many developers is incorrectly referencing the destination part, so it’s essential to double-check that each script points to the correct opposite pad. Employing a clear and consistent naming convention for your teleporter pads, such as 'Teleporter1' and 'Teleporter2,' truly simplifies the scripting process and reduces potential errors. This robust approach ensures that players can seamlessly travel back and forth between two key locations, significantly enhancing navigation and flow within your game world. Always remember to test both directions thoroughly to guarantee smooth and glitch-free transitions for everyone. This attention to detail makes all the difference.
6. Q: What are common issues with teleporters and how can I debug them?
A: Teleporters, despite their apparent simplicity, can sometimes present a few perplexing issues, leaving players stuck, falling through the world, or simply failing to teleport at all. Often, the root cause can be traced back to incorrect `CFrame` assignment within your script, simple misspelled part names that prevent script references from working, or more subtle problems with reliably detecting the player's character during the `Touched` event. To effectively debug these snags, becoming proficient with `print()` statements in your script is invaluable. These statements allow you to output messages and variable values directly to the Output window in Studio, helping you trace the script's execution flow step-by-step. Always scrutinize the Output window for any error messages, as these frequently pinpoint the exact line of code causing trouble. Sometimes, the destination part might be positioned infinitesimally too low, causing players to momentarily clip into the ground before falling. Adjusting the Y-coordinate slightly upwards, adding a small buffer, can miraculously resolve this. Don't be afraid to systematically experiment with your code and trace its logical path; it's a fundamental and rewarding part of the debugging process. You've got this, debugging makes you a stronger developer!
7. Q: How can I add a cooldown to my teleporter to prevent spamming?
A: Implementing a cooldown mechanism on your teleporter is an excellent practice that prevents players from rapidly spamming the teleporter, which can often be disruptive to gameplay or even exploited in some scenarios. You can effectively introduce a cooldown by utilizing a simple boolean variable, for instance, `canTeleport`, which you'd initialize to `true`. When a player successfully activates the teleporter and is moved to their destination, you immediately set `canTeleport` to `false`. Following this, you employ `task.wait(cooldownTime)` to pause the script's execution for a specified duration, representing your cooldown period. After this waiting period elapses, you then reset `canTeleport` back to `true`, making the teleporter available again. Crucially, before allowing any teleportation to occur, your script must include an `if` statement that checks if `canTeleport` is currently `true`. This simple but effective mechanism ensures fair, controlled, and balanced use of your teleportation mechanics within the game. For an even more polished user experience, consider displaying a visual countdown timer or a 'cooling down' message to the player; that's a true pro move! Try implementing this tomorrow and let me know how it goes; it’ll make a huge difference.
8. Q: How do I ensure only specific players or groups can use a teleporter?
A: Restricting access to certain teleporters adds a fantastic layer of progression, exclusivity, or strategic depth to your Roblox game. To achieve this, your script needs to perform checks against the player's properties or their group affiliations before allowing a teleport to occur. Within your script, you can easily access `player.Name` to check for specific usernames if you need to grant access to a select few individuals. For broader group-based access, the function `player:IsInGroup(groupId)` is invaluable, allowing you to verify if a player is a member of a particular Roblox group (you'll need the group's ID). If you're looking to create premium-only zones, you can check `player.MembershipType == Enum.MembershipType.Premium` to verify if the player has a Roblox Premium subscription. These checks are typically implemented as an `if` statement right at the beginning of your teleportation logic. The script will only proceed with the teleport if all the specified conditions are met; otherwise, you might display a message indicating why access is denied. This selective access is a powerful tool for rewarding loyal players, integrating game passes, or controlling progression paths, making your game feel more structured and rewarding. You're definitely on your way to advanced game design now!
9. Q: What's the best practice for placing destination parts to avoid glitches?
A: When it comes to placing your teleporter destination parts, precise and thoughtful positioning is absolutely critical to avoid frustrating glitches and ensure a smooth player experience. The best practice is to always position the destination part slightly above the ground or the floor level, typically by about half the character's height plus a small, forgiving buffer. This slight elevation prevents characters from clipping into the terrain or getting stuck in the ground upon arrival, which can be a common and annoying issue. Furthermore, always ensure that there are no other parts, especially invisible collision blocks, directly overlapping or extremely close to your intended destination point. These hidden obstacles can lead to players spawning inside geometry or immediately getting stuck. Critically, consider the `Rotation` (orientation) of your destination part, as players will instantly spawn facing that exact direction. I get why this confuses so many people, because an accurate `CFrame` is paramount, but thinking about the player's immediate surroundings is just as important. Testing extensively with various character models and sizes helps identify any lingering issues before your game goes live. A well-placed destination not only prevents glitches but also significantly enhances overall player immersion. You've got this, a little foresight goes a long way!
10. Q: How can I visually indicate a teleporter's function to players?
A: Visually indicating a teleporter's function is incredibly important for clear player guidance and intuitive navigation within your Roblox game. Players shouldn't have to guess what a mysterious part does; its purpose should be clear at a glance. Consider employing unique textures, perhaps a shimmering or swirling pattern, or glowing effects that draw the eye to the teleporter pad. Utilizing particle emitters to create subtle, magical, or technological visual effects (like a gentle sparkle or a rising mist) can also hint at its purpose. Distinctive colors that contrast with the environment, or even unique shapes for your teleporter parts, are very effective. Adding floating UI elements, such as a transparent `BillboardGui` with text labels like 'Teleporter' or 'Warp Zone,' provides explicit instructions. A subtle but distinct sound effect, like a soft hum or a gentle 'whoosh' when a player steps on it, can further reinforce its function through auditory cues. Consistent visual language throughout your game creates an intuitive and enjoyable navigation experience. Think about iconic sci-fi teleporters or fantasy portals for inspiration; they all communicate their purpose effectively. These small details make a big difference in player experience, guiding them exactly where they need to go. You're thinking like a user experience designer now!
Advanced / Research & Frontier 2026
11. Q: How can I create a dynamic teleporter that warps players to a random location?A: Creating a dynamic teleporter that warps players to a random location introduces an exciting element of unpredictability and replayability to your game. This advanced setup involves first pre-defining a collection of potential destination `CFrames` or `Vector3` positions. You can store these coordinates in a Lua table within your script. When a player activates the teleporter, your script will then leverage `math.random()` to randomly select one of these `CFrames` from your prepared table. This technique is absolutely fantastic for generating unpredictable game experiences, such as entry points to random dungeons, a 'mystery' teleporter that always leads somewhere new, or even a strategic escape route with varied outcomes. Crucially, ensure that all your potential random destination points are safely accessible and free of obstacles, preventing players from spawning inside walls or falling out of the world. In the year 2026, consider leveraging advanced procedural generation techniques in conjunction with this concept for truly unique, dynamically created destinations each time. This not only adds significant replayability but also keeps players engaged and surprised, making your game feel fresh with every play session. You've got this, the possibilities are endless!
12. Q: What are the implications of network lag on teleporter performance?
A: Network lag, commonly known as 'Ping' in the gaming world, can indeed significantly impact the perceived performance and smoothness of your teleporter systems. High latency might cause noticeable visual anomalies: players could momentarily appear at the origin point before suddenly snapping to the destination, or even worse, they might experience getting stuck or rubber-banding if the server-client synchronization is poor. To effectively mitigate these undesirable effects, it is absolutely crucial to ensure that your core teleportation logic is primarily handled on the server-side. The server should be the authoritative entity that validates the teleport request and then executes the actual character movement. While some advanced frontier models in 2026 are exploring sophisticated client-side prediction techniques for smoother visual transitions, server authority remains paramount for maintaining game integrity, security, and consistent player states across all clients. Always prioritize server-side validation and execution for critical actions like teleportation. This approach minimizes the potential for exploits and ensures fair and reliable gameplay for everyone, regardless of their individual network conditions. It's about balancing responsiveness with security.
13. Q: Can I create visual effects (VFX) or sound effects (SFX) that accompany a teleport?
A: Absolutely! Adding compelling visual effects (VFX) and immersive sound effects (SFX) dramatically enhances the overall feel and player experience of teleportation, transforming a simple position change into a memorable event. You can easily spawn particle emitters at both the player's origin point and their destination using `Instance.new(
Roblox Teleporter creation guide, Scripting teleport pads, Lua scripting for teleportation, Teleporter setup in Roblox Studio, Advanced Roblox teleport techniques, Troubleshooting Roblox teleporters, 2026 Roblox scripting updates, Seamless player transport Roblox, Building interactive game elements.
35


How To Make A Teleporter In Roblox Studio 2025 YouTube . How To Make A Teleporter In Roblox YouTube . How To Make A Teleporter In Roblox Studio Working Teleporter KIT . How To MAKE TELEPORTERS In Roblox Studio YouTube . How To Make A Teleporter In Roblox Studio 2024 YouTube


How To Make TELEPORTERS In ROBLOX STUDIO YouTube . How To Make A Teleporter In Roblox Studio Tutorial YouTube . How To Make Door Teleporter Roblox Studio YouTube . How To Make A Teleporter Roblox Studio YouTube . How To Make A Teleport Portal In Roblox Studio YouTube


HOW TO MAKE A E TO TELEPORT Roblox Studio Tutorial YouTube . How To Make A Game Teleporter In Roblox Studio 2025 YouTube . ROBLOX STUDIO HOW TO MAKE TELEPORTER YouTube . HOW TO MAKE A TELEPORTER In ROBLOX STUDIO YouTube . How To Make Teleport Buttons In Roblox Studio YouTube


How To Make A Lobby Teleporter In Roblox Studio FAST EASY 100 . How To Make A Teleporter In Roblox Studio 2024 YouTube . How To Make A Teleport Part In Roblox Studio YouTube . HOW TO MAKE A GAME TELEPORTER Roblox Studio Tutorial YouTube . How To Create A Teleporter In Roblox Studio YouTube


How To Make A GAME TELEPORTER ROBLOX STUDIO 2024 YouTube . Police Reveal How To Make A Teleporter In Roblox And The Problem Police Reveal How To Make A Teleporter In Roblox And The Problem Escalates . How To Make A Tool Roblox Studio Tutorial YouTube . How To TELEPORT A PLAYER In ROBLOX STUDIO YouTube . 2026 How To Make A Part Teleport To A Different Place In Your Game In Hqdefault


How To Teleport Players To Other Games In Roblox YouTube . How To Make Click To Teleport Part Roblox Obby Creator YouTube . How To Make A Teleporter In Roblox Studio YouTube . How To Make A TELEPORT BUTTOM Roblox Studio Tutorial 2024 YouTube . How To Make Teleporter In Hytale March 2026 Fast Travel Guide How To Make Teleporter In Hytale 1024x576


How To Make A Key Press To Teleport System In Roblox Studio YouTube . HOW TO MAKE A TELEPORT BUTTON IN ROBLOX STUDIO Roblox Studio . How To Make A Teleporter In Minecraft Nintendo Switch Edition At John . How To SCRIPT A TELEPORT SYSTEM On ROBLOX STUDIO FULL TUTORIAL YouTube . How To Make A Teleport Button In Roblox Studio YouTube